Scanning best practices
Black Duck provides a wide array of scanning technology for performing software composition analysis, identifying open source software (OSS) and other third-party components present in software, so that the risks associated with using these components can be managed more effectively. This guide provides best practices for scanning. It assumes that you have already been introduced to scanning with Black Duck and know the basics of how to perform scans.
This document includes information on:
-
What scanning client tool to use when configuring scans
-
What mode of scanning—full or rapid—to use when scanning
-
What is asynchronous versus synchronous full scanning and when to use them
-
How to configure automated scans (for example, in a build server or in a CI/CD context)
-
How to optimize scanning for performance
-
How to avoid common pitfalls
Readers should also check the Black Duck Documentation Portal for additional content pertaining to scanning best practices.
About scanning tools, scans, and project versions
To make the most of the best practices it is important to understand some basic behaviors of scanning and how scan results are made available to users through project-versions.
Black Duck Detect and the underlying tools used by it
Black Duck Detect is the recommended client tool for scanning using Black Duck. It is packaged into a command line interface (CLI) and desktop GUI. Black Duck Detect makes it easier to set up and scan code bases using a variety of languages/package managers.
It uses several underlying tools to perform scanning including the Detector (for inspecting package manager dependencies), Signature Scanner (for inspecting the file system), and other tools. Options can be used to explicitly enable or disable these underlying tools, but by default Black Duck Detect will run both the Detector and Signature Scanner to provide good coverage on the code being analyzed.
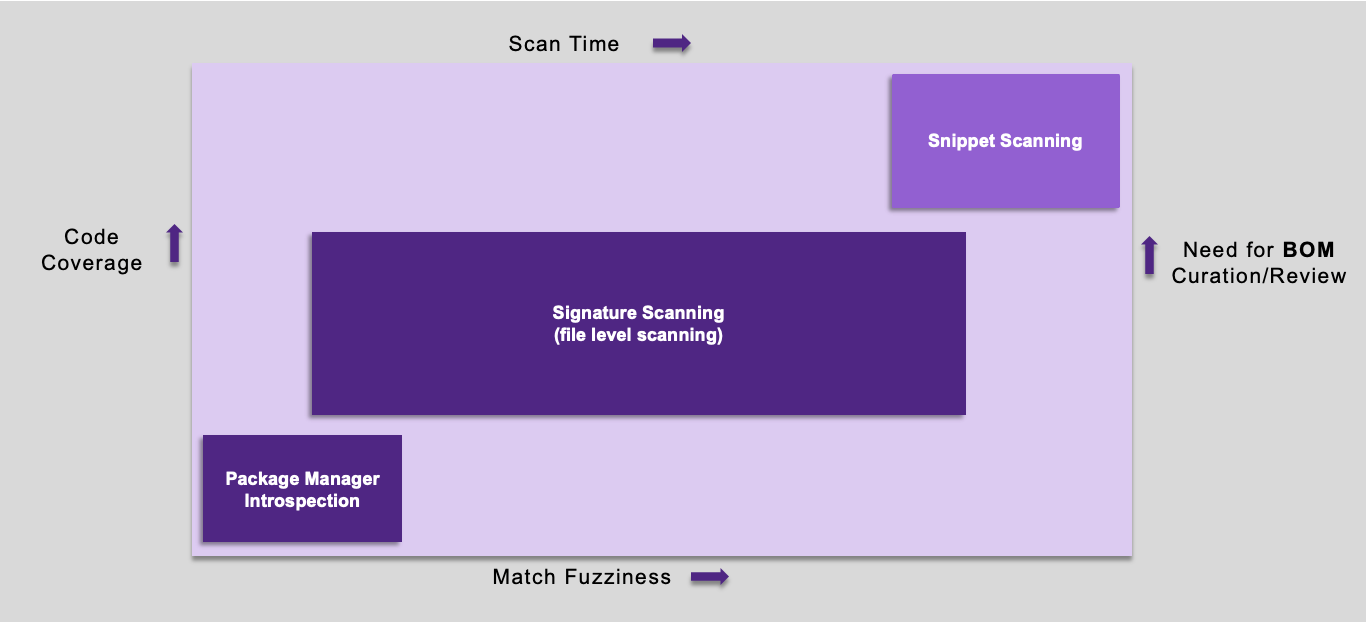
The various scanning tools can increase code coverage, or fidelity, but at the expense of scan time and match fuzziness; see the diagram below. For instance, using package manager inspection, plus Signature Scanner, and snippet scanning provides the highest level of coverage but takes longer and will result in higher False Positive (FP) rates. Customers who want to optimize for speed may find using the package manager inspection provides sufficient coverage with very low/zero FP rates in a fraction of the time it takes to perform signature scanning.
Signature scanning is most often needed when there is no package manager inspection possible or when you need to be able to find use of components that are not declared by the package manager(s).
Snippet scanning is for the purpose of identifying code that was copied from some open source project and pasted into proprietary source files.
The differences between full and rapid scanning
Black Duck Detect offers two modes of scanning: full and rapid. Full scanning is used for source control branches (see the Gitflow discussion below) which are long-lasting or otherwise significant, such as release or integration branches. Rapid scanning is for transient or other less significant branches, such as a developer’s working branch, where a persistent record of the results is not needed, and the primary goal is to provide the developer with feedback.
Use full scanning when the results should be persisted in the Black Duck server to track over time. Persisted results will be updated whenever new security violations or changes in license usage are recorded in the Black Duck KnowledgeBase (KB). Full scanning can also employ more detailed scanning techniques, including signature, snippet, and string search scanning.
Use rapid scanning when persisting the data in Black Duck is not necessary. This is often the case when a developer wants quick results to determine if the versions of open source components included in a project violate corporate policies surrounding the use of open source. Rapid scans quickly return results, as they only employ package manager scanning and do not touch the Black Duck server database. Large customer deployments will often generate 10s of thousands of rapid scans a day.
The relationship between scans and project versions
A scan occurs when a scan client (for example Black Duck Detect) is
pointed at a folder (or a single .tar file).
There are two major sub-modes of full scanning: asynchronous and synchronous. Rapid scanning is always synchronous.
By default, full scans are asynchronous. This mode provides the best performance since the scan client does not wait for the results of the scan. An asynchronous scan works as described below
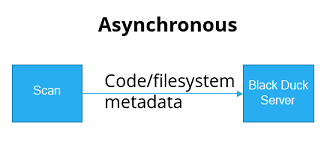
- Scans generate metadata. Metadata includes:
Information from package managers regarding what open source components are used by the project
File hashes
Directory (folder) and file information
-
Metadata is uploaded to the Black Duck server by the scan client and, once the upload is complete, the scan client is finished.
-
Return/done (check for results later).
Therefore, an asynchronous scan is appropriate when performance is more important than obtaining the results immediately. Users can check for the results later using either the Black Duck UI or REST API. Black Duck Alert can also be used to push notifications of scan results to users.
In some cases, the results are needed immediately, for example, to “fail the build” for policy violations. In these cases, use a synchronous scan, as shown:
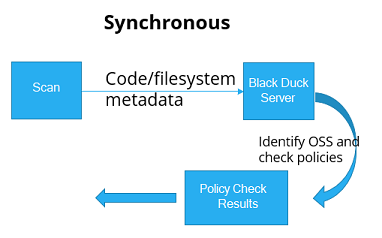
When using Black Duck Detect with either the --detect.policy.check.fail.on.severities or the rapid scanning properties set, a synchronous scan is performed which does the following:
-
The scan uploads metadata to the server.
-
The server processes the scan and assesses the results, including checking if any policies are violated.
-
For rapid scans, the list of policy violations is output to the command line. For full scanning, those results are available in the Black Duck UI or via the REST API.
-
The scan client (Black Duck Detect) waits for the results and exits appropriately, for example, the exit status is set to a non-zero value if any policies are violated.
So, an asynchronous full scan simply uploads the scan data and returns which is the best mode when optimizing performance for persisted scan results. A synchronous scan uploads the scan and waits for the results which is the right choice if the results are needed immediately.
Scans and scan names
A scan gets a name which, by default, the Black Duck scan client generates. The derived name is formed by combining the hostname of the host running the scan with the full path of the folder being analyzed.
You can override the default and supply your own scan name by using the --detect.code.location.name property in Black Duck Detect (the recommended method) or the --name parameter if you are using the Signature Scanner CLI. Project and version names can be controlled using --detect.project.name and --detect.project.version.name, respectively.
For rapid scanning, use of the --detect.code.location.name property is recommended, as this allows scanning usage statistics to be grouped across non-notable source control branches for the same projects.
If you full scan again using the same name, the results of the previous scan are overwritten.
Scans and project versions for full scanning
A scan is mapped to one, and only one, project version. A project version can have more than one scan mapped to it in the Black Duck database.
This allows mapping multiple, separate folders and the results of their scans into one aggregated project version. For example, you might have a library in one folder and the application that uses the library in another folder. You can scan the library’s folder and the application folder separately and map their full scans to the same project version in Black Duck to see the aggregate of both the library and application.
Note that if you delete a project version, it does not delete the scans that were mapped to it; it simply unmaps the scans. If your intent is to clean the system of both the versions and the scans, you need to delete the project version and the scan. (Note that for rapid scans, no persistent BOM for such scans is created, so this problem does not occur.)
Individual file matching for full scanning
Individual file matching is the identification of a component based purely upon
the checksum information of a single file. Prior to Black Duck 2020.2.0, for a
small set of file extensions (.js, .apklib,
.bin, .dll, .exe,
.o, and .so), regular signature scanning
matched files to components based upon a checksum match to the one file.
Unfortunately, this matching was not always accurate and produced a fair number
of false positives. These false positives required you to spend additional
effort to review and adjust the BOM. Though some users may desire this level of
precision and granularity in their BOMs, most customers did not desire or need
this level of matching. Therefore, individual file matching is no longer the
default behavior and instead is an optional capability as of the Black Duck
2020.2.0 release.
This may cause some components to drop off your BOM, which may or may not be desired. Therefore, in the Black Duck 2020.2.0 release, Black Duck provides parameters in the scanning tools so that you can re-enable individual file matching. Refer to the Signature Scanner CLI and Black Duck Detect documentation for more information.
When to use Black Duck Binary Analysis versus Black Duck
You may be confused as to when to use Black Duck Binary Analysis (BDBA) and when to use (standard) Black Duck source scanning.
BDBA is a security-focused application composition analysis scanner. It operates purely on provided binary images or compiled applications. There are a wide range of different binary file formats, CPU architectures, and programming languages/environments covered by BDBA. Refer to the BDBA FAQ located in the Black Duck Documentation Portal for more details.
Black Duck (without BDBA integrated) provides scanning capabilities focused on the development of applications or products based on analyzing source code. It can also recognize some binary files, but does not inspect binary files contents as does BDBA.
You may find it difficult to know which technology to use in your SCA solution. BDBA should be used to analyze:
-
3rd party software supplied in binary form, for example, in a software supply chain scenario
-
Software in binary form where you do not have access to the source used to build it
Black Duck should be used when you have access to the source code or build environment used in the construction of software.
Sometimes the above use cases are intertwined. For instance, you have a software project based on the inclusion of one or more binary files from 3rd parties (free and open software (FOSS) and/or commercial). In this case, you might separate the analysis into two parts – the binaries are analyzed using BDBA and the source code is analyzed using Black Duck. Then merge the results to get a total BOM for your project.
Both products support analysis of docker images, although they approach the problem in different ways and can therefore produce different results. But the same guidance provided above applies. If you are building a docker image you may find it more effective to use Black Duck to analyze what you put onto a base docker image and then analyze the base image using BDBA. Or you can analyze the image using both products and merge the results to have a more complete picture of what is inside the image. On the other hand, if you are receiving, or using, images without any access to the source code used to build the image or to the code layered onto the image, BDBA may prove a better fit to analyze the image contents. Some experimentation may be required to determine the best fit for your needs.
Additional details can be found in the BDBA FAQ and product-specific guides for each product.
Configuring automated scans
Setting up automated scans, for example, in a build server or CI/CD context, requires thinking about:
-
Where/when in the build process to invoke the scan
-
Whether to perform a full or rapid scan and if full scanning, whether the scan should be synchronous or synchronous
-
Scan name(s), project version to map the scan (or scans) to, and versioning
Where/when in the build process to invoke the scan
When using a build system such as Jenkins, scans should be run as a post-build step. Performing the scan as a post-build step ensures we can maximize the accuracy of the scan results by scanning the package manager files (if present), the resulting binaries, and the source code.
Another consideration when configuring automated scans is the size and complexity of what is being scanned. It might be advisable to split the scanning into multiple smaller scans if the project being scanned is particularly large (for example larger than 1 GB) or complex (for example, having more than 10,000 files), but this limit does not apply to package manager-only scanning.
For small projects, rapid scanning or package manager-only full scanning in a single post-build step is usually sufficient.

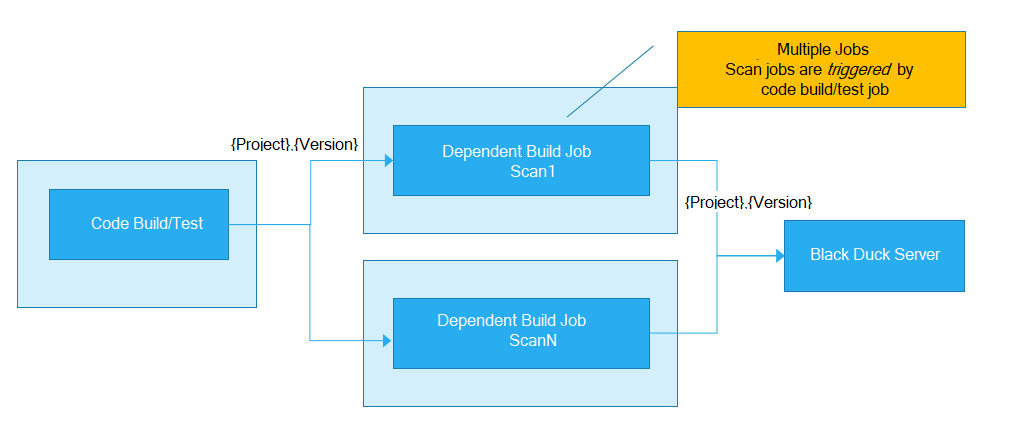
For large projects using the Signature Scanner, Black Duck recommends splitting up the scanning into multiple smaller scans that all get mapped to the same project version to aggregate the results. There are multiple ways to split the scanning, and most do not require any change to how the code is built.
For instance, suppose you have a large project that is spread across multiple folders. Instead of having one scan starting from the parent folder for the project, configure scans on each of the subfolders. Each scan is still mapped to the same project version and, as a result, overall scan time will be reduced, and the results will still be aggregated in Black Duck.
As shown, in Jenkins, this can be done by having multiple, downstream jobs scan the subfolders. Or, you could write a shell script that does multiple scans as a post-build step within the parent job.
Asynchronous versus synchronous full scans
When setting up the automated full scans, determine if the scans will be asynchronous (default) or synchronous. If the intent is to provide immediate feedback and “break the build” when policy violations occur, use a synchronous scan. However, if performance is more important than providing immediate feedback, then an asynchronous scan is the best choice.
Scan names, project versions, and versioning for full scanning
We want to configure scans to generate the business results needed and to minimize having to delete or purge items from the database over time. The business results needed usually include:
-
Giving developers early warning that the open source they are using has risks associated with it, so they can choose appropriate alternatives to avoid those risks
-
Retaining knowledge of software that has been distributed (for example, within a product, or as part of a service run in production)
-
Providing the organization with an overall view of the open source in use and the risks associated with it
We want to avoid setting up full scans in a way that leads to unbounded growth of data since that clutters the system and can cause system performance to degrade very quickly. And we want to avoid the need to purge or delete items since that is often neglected or forgotten and can be time consuming in any case.
How do we do this?
Projects using multiple branches
In projects with multiple branches there is invariably one branch that is used to release/distribute software from, and the others are used for development/testing leading up to a release (also known as distribution). We want to configure scanning such that we retain the information corresponding to what is distributed (released). If scans are configured on other (non-release) branches, for example, to give early warning to developers, those scans should be rapid scans or, if using full scans, always overwrite the previous scan results. Setting up the scanning this way allows us to achieve our business goals while minimizing scan/version proliferation.
The best way to describe the method is by looking at the branches in a Gitflow model. In the Gitflow model, software is only distributed (released) from the Master branch and each version is given a label which comes from source control (for example, GIT). Other branches, such as Release or feature branches, are used for intermediate builds and do not get distributed.
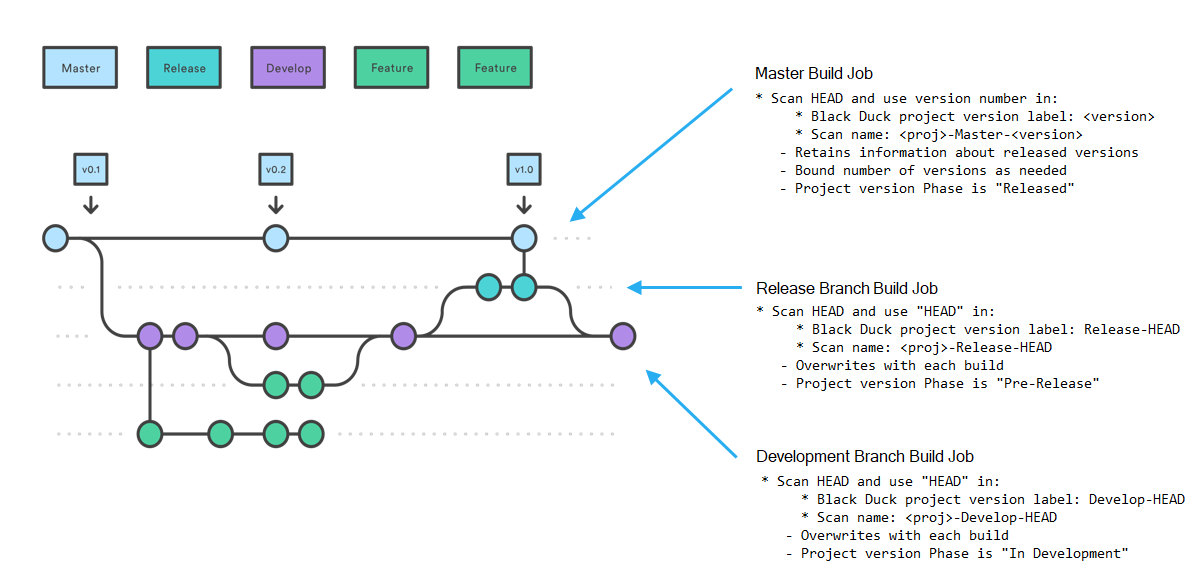
This diagram depicts configuring three types of build/scan jobs that occur whenever a commit happens on their respective branches. The next sections provide details on how to configure scans for each branch.
Rapid scanning a working branch
Developers’ working branches should be scanned using the rapid scanning mode, and where possible, a project name, release name and/or branch name where applicable should be provided using the rapid scanning. No results or a BOM will be kept on the server. Thousands of such rapid scans per day can easily be run against a single server. Rapid scans give a quick check of policy violations for the projects open source components. Thus, security or licensing policy violations need never enter the code base.
Full scanning the Release branch
The scan on the Release branch uses the name "HEAD" for the project version and scan names to ensure that the latest scan and BOM results are always overwritten. As the diagram shows, we configure the scan of this branch to use the scan name <proj>-Release-HEAD where <proj> represents the project name. The other sections of the scan name are fixed so that each time a new scan occurs it overwrites the previous scan. The project version label is set to “Release-HEAD” and the project version phase is set to Pre-Release to indicate that this scan is for code that is about to be released.
This gives development and security management an early warning about components they have chosen which do not conform to policy or perhaps include high risk security vulnerabilities.
We do not care about retaining history, and it would be wrong to keep prior versions because it will clog your system and does not provide any business benefit.
Full scanning the Master branch
In Gitflow, all releases happen off the Master branch, and we want to retain knowledge of released versions because those are the ones that run in production or are distributed to customers. We therefore use a version number, usually pulled from a file in the source code, and use it as part of the project version and scan names to ensure that the scan and BOM results are retained for all released versions.
By maintaining all the released versions, we ensure that the Black Duck system can notify you about future vulnerabilities that affect components used in those released versions.
By only creating full scans for controlled release versions we keep the number of versions retained in the system to a minimum.
This project version has the Released phase.
The following table shows the project version and scan location names if your project is named MY-SAMPLE-PROJECT:
| Branch | Scan/Code Location Name (--detect.code.location.name property) | Project Version Name (--detect.project.version.name property) |
|---|---|---|
| Working Branch | $(branch_name) | $(version_label_from_source_code_if_available) |
| Release | MY-SAMPLE-PROJECT-Release-HEAD | Release-HEAD |
| Master | MY-SAMPLE-PROJECT-$(version_label_from_source_code) | $(version_label_from_source_code) |
Projects using a single branch
Customers developing web- or micro-services usually do their development on a single branch.
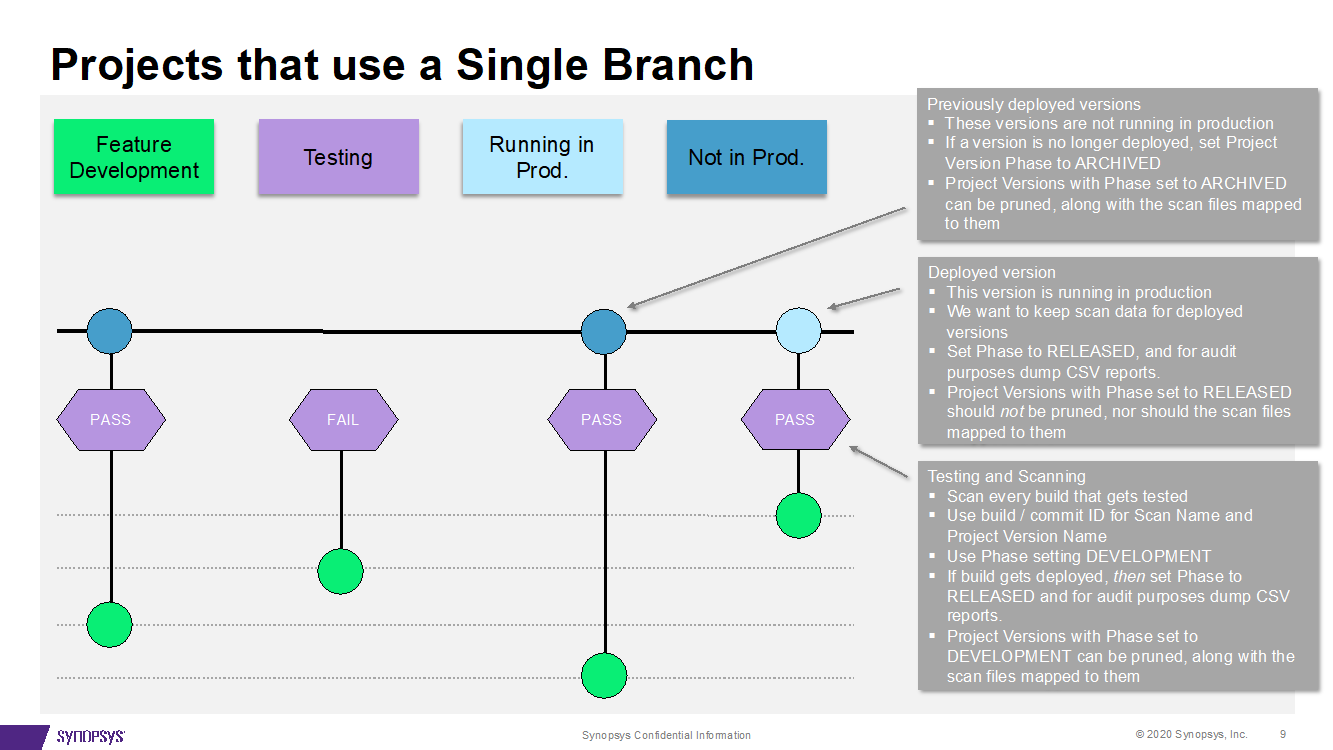
In these projects a stream of commits is tested and optionally pushed to production based on the test outcomes. Each version must be scanned at the time of the commit, but which version makes it to production is not known until sometime afterward. In this case, Black Duck recommends:
-
Using a build or commit ID in the scan and version name to distinguish versions and scans.
-
Use phase setting DEVELOPMENT for the initial scan.
-
When tests indicate a version will be pushed to production (in other words, released), automate marking the phase of that version as RELEASED. Mark all other versions, previously marked as RELEASED, as Archived or DEVELOPMENT so they can be removed from the system based on age.
-
Automate deleting old versions, and scans, whose phase is non-RELEASED to retain only the (one) RELEASED version.
For audit purposes, save the .csv reports for all RELEASED
versions off-line.
Scanning docker images
Another common scanning use case is to analyze a docker image using the Black Duck Detect Docker Inspector module. The simplest and sometimes most effective approach is to scan the whole image which results in a combined list of components, and vulnerabilities, for the entire image.
Often, customers want to separate issues pertaining to the base image(s) from the application code they load into it. In that case, break down the analysis of a docker image into two parts:
-
The base image (that is, the image named in the FROM statement), and
-
What you put on top of the base image, that is, your application
The way this is done is:
-
Analyze the base image using Docker Inspector, mapping the results to its own project-version.
-
Now, using the docker image that combines the base and your application code, obtain the top layer ID (the layer above which your application code resides).
-
Use the docker inspector with the --docker.platform.top.layer.id property, analyze the combined image (base + application) and provide the top layer ID from step 2. Map the results to a separate project version which will contain only the parts loaded on top of the base image.
Signature scanning very large projects
If you have a very large project (for example, a 4.5 GB monolithic project with 500+ files) and need to use the Signature Scanner, your initial instinct may be to scan the entire project in one full scan. However, this is the incorrect approach as a single scan of a very large project can stress your Black Duck system (you may need to add additional RAM and CPUs to process the scan). If there are any changes — even if only a small portion of the code has changed — you will need to rescan the entire project each time and look at the results for the entire project. Additionally, you lose the ability to have a flexible policy management system (for example if you want different subcomponents managed differently), which would not be possible with a single scan.
The correct way to manage signature full scanning for a large project is to divide the project into multiple scans by using multiple dependent jobs. These multiple scans can then become subprojects which you aggregate into one parent project. This scanning strategy has these benefits:
-
Only need to full scan and inspect what has changed.
-
Can still report on the entire project.
- Provides a flexible policy management system:
Different sub-components can be managed differently.
The parent can still be treated as a single entity.
Handling reusable modules (libraries)
Suppose you want a BOM for a library which is contained in one folder to be combined with an application that sits in another folder. This section describes the two methods you can use to accomplish this by:
-
Aggregating multiple full scans into the same project version.
-
Creating a BOM hierarchy.
Aggregating multiple full signature scans
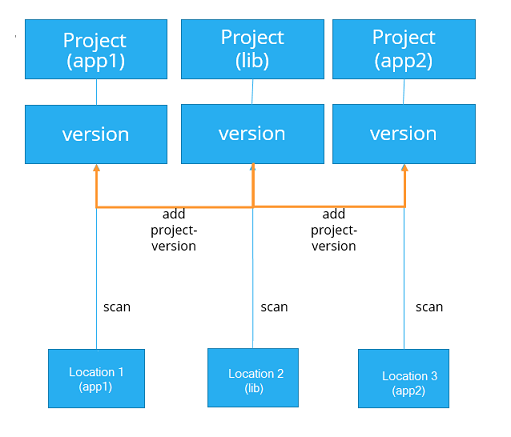
To aggregate the results of multiple scans, point those scans to the same project and version. For example, in the example of a library that sits in one folder and an application (that uses the library) in a separate folder:
-
Scan the library folder and map the scan to a project (for example, my-application) and version (for example, 1.0).
-
Scan the application folder and map the scan to the same project (my-application) and version (1.0).
Note:
-
The resulting aggregate BOM represents both the library and the application.
Note that the Component tab for the project version displays a "flat" view of components — all components found during the full scans – regardless of the directory were the component was found — are listed at the same level on the Component tab.
-
Use the --detect.code.location.name property to avoid scan name conflicts. This allows reuse of the same physical location into multiple projects. This is useful if the library is used by more than one application and you want the contents of the library reflected in all the applications that use it. In that case, scan the same library folder multiple times giving each scan a unique name and map the scan to the application that uses it.
-
You must rescan to update the combined BOMs.
For example:
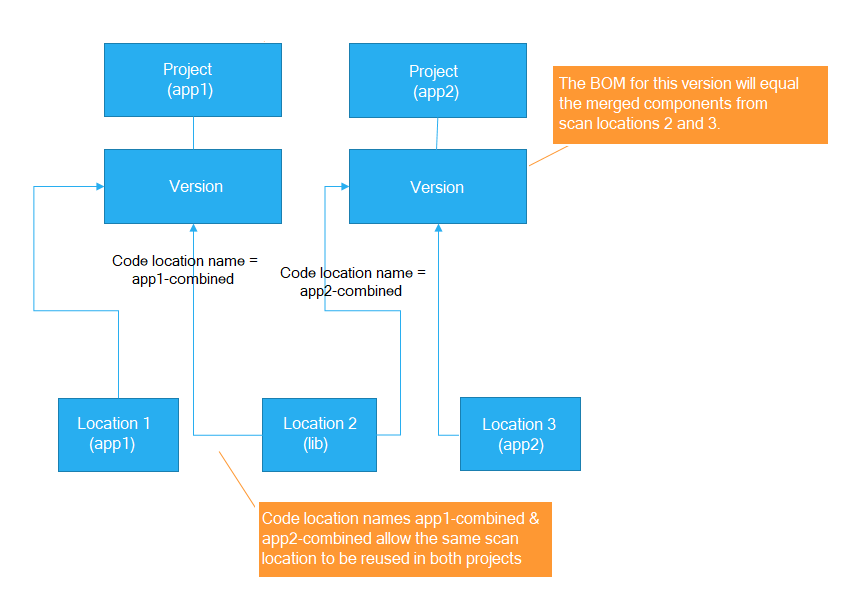
Using a project hierarchy
In this option, use a different project and version name in Black Duck Detect for each full scan. In the parent BOM, add the library module project version as a subproject. In this scenario, subsequent full scans/changes to the subproject are immediately reflected in the parent BOM.
So, in our example of a library in one folder and an application in a separate folder, do the following:
-
Scan the library folder and map it to its own project (for example, my-library) and version (for example, 1.0).
-
Scan the application folder and map it to a separate project (for example, my-application) and version (for example, 2.0).
-
In the Black Duck UI, navigate to the Component tab for application project (my-application) version (2.0).
-
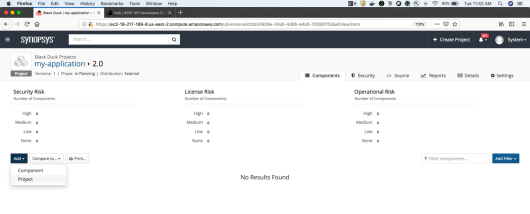
Add the library’s project (my-library) to the BOM of the application project (my-application, version 2.0): click Add and select Project from the list. The UI prompts you for the version (1.0) and after you confirm the addition, the component list from the library project version will be included in the application’s BOM:
The diagram below depicts the case where a library is used by two applications. Project (lib) is added as a subproject to the BOM of Project (app1) BOM and/or Project (app2).
Using a project hierarchy in this way isolates the full scans of the library (child project) from the applications (parent projects) that use it. It also encapsulates the BOM for the library from the projects that use it, so you can view and interact with the library and its contents separate from the application BOM which simply includes the library’s results.
Scanning when network connectivity is an issue
If network connectivity is an issue, use a store and forward strategy:
-
Use the Black Duck Detect --blackduck.hub.offline.mode=true property. This disables all communication with Black Duck but still generates metadata.
-
Forward and then upload to Black Duck separately.
Poor scanning techniques
Including the commit ID or build ID in the Black Duck version or scan names
Some customers have been reporting poor performance of their Black Duck server. There are several ways that this can happen, but for many of these customers their Black Duck server/database was filled with hundreds or even thousands of spurious versions and full scans because they used either a commit ID or build ID in the project version name or scan name when they configured their scans for their automated builds. In some cases, without realizing it, they had configured a system of continually creating new versions and full scans with no thought to purging old ones or had no effective automated solution for keeping the system from clogging up.
Once their system got to the point of having all those hundreds or in some case thousands of unwanted versions or scans, cleanup becomes a huge issue since deletion is slow in an overloaded system and deleting scans/versions is a scary prospect when you are perhaps uncertain what is important to keep and what you can discard. It is much easier if you never get to this point in the first place.
This is more than a performance degradation issue. This also makes the resulting project version BOM inaccurate since the builds occur over time and the resulting BOM is the aggregation of all the full scans.
Keeping a history of versions on a development branch when full scanning
Some users say they want to keep a history of the versions on a development branch so that they can determine when the development team introduced an issue.
However, Black Duck was not designed to be a data warehouse, keeping all information forever. If you are trying to use the Black Duck system in this manner, your server/database will be overwhelmed with too much data. Performance will begin to severely degrade, and the system will become unusable.
If your goal is to understand forensically what has happened over time, the appropriate way to approach this is to export the scan results from the system (for example, using the Black Duck reporting database or REST APIs) to a data lake or data warehouse that is designed to accumulate large amounts of data and supports the slicing/dicing of the data. That capability is outside of the scope of what the Black Duck server was designed to do.
Avoid Parallel Scanning of the Same Code Location
Parallel scanning of the same code location using the same
scan_name (code.location.name) can lead to conflicts and
unexpected results due to architectural limitations. To ensure accurate and
reliable scan outcomes, adhere to the following best practices:
- Queue or Cancel Overlapping Scans: Avoid triggering multiple scans
with the same
scan_namesimultaneously. Instead, queue scans or cancel overlapping ones to prevent resource conflicts and race conditions. - Limit Scan Containers: Use a single scan container per deployment to eliminate conflicts. Be aware, however, that this approach may skip scans that are already in progress.
- Understand Architectural Constraints: Scan containers are not designed for parallelism. Running multiple scan containers on the same code location splits resources and causes race conditions, leading to incorrect or incomplete results.
- Monitor Scan Status: Utilize UI and API tools to monitor scan status and avoid triggering parallel scans unintentionally. Improved scan visibility tools are being developed to help customers manage scan workflows effectively.
Note: Future architectural improvements, such as scan ID protocols and removing synchronous locks, are planned to enhance scan handling and coordination. Until these changes are implemented, customers should avoid frequent parallel scans of the same code location and follow these updated best practices.
